Macro photography: the art of photographing small creatures and objects with the right lenses, tips, and a trained eye so that they appear huge and rich in detail. This allows you to see even tiny details in the finished pictures that you would never notice in conventional plant and animal photos or with the naked eye. No wonder nature blossoms in spring and summer, just like its favorite subjects in flora and fauna.
Lighting also plays a crucial role – for both indoor and outdoor shoots. But nature photographers are not the only ones who use macro photography for great animal and plant pictures.
Everyday objects, people, and other subjects can also appear mysterious and captivating when captured in a close-up. In this article, we will show you how to develop an eye for the details in a macro photo, provide a guide with helpful tips, and tell you what equipment you need besides lenses.

What is macro photography?
As soon as it gets warmer outside, everything starts to buzz and hum, crawl and jump again. Sometimes it drives you crazy, and other times the diverse and vibrant beauty enchants you. The warmer time of year offers a remarkable array of insects, which are more common on our planet than any other species.
Photographing insects and animals in close-up offers an almost inexhaustible variety of subjects and also includes some challenges that an aspiring macro photographer must overcome. Macro photography is particularly well suited for exploring and visualizing the habitat of these small creatures.
In addition to insects, arachnids, amphibians, reptiles, plants, and mushrooms can also be excellent macro subjects to be displayed on the big screen.
- But what is the right approach to this type of photography?
- What equipment is needed for successful photography of small things?
- Which lenses are suitable?
- What other tips can we give you?

Equipment for macro photography: Lens & Camera
In addition to having the right eye, equipment is only half the battle for fascinating close-ups in nature or in the studio. Nevertheless, a basic understanding of the technology (camera, lens & co.) is important.
According to DIN 19040 of macro photography, anything in the scale between 1:10 and 10:1 is considered macro.
However, what is typically understood as macro photography (i.e., the detailed depiction of things that are barely visible to the naked eye) only begins at a magnification ratio of 1:1. In principle, almost all cameras are suitable – whether SLR or mirrorless camera.
However, a good DSLR or DSLM with the option to change the lens for optimal macro photography has proven to be the best camera for macro photography.
But the good news is: impressive macro photos can also be achieved with simple and not overly expensive equipment. Much more important than the type of camera is the right lens for macro photography, which significantly influences the image quality. It is optimal to use a special macro lens or – if not available – a close-up lens that can be used accordingly. Because, of course, a high magnification ratio can be achieved simply by getting close to the object. But most commercially available lenses can no longer focus at short distances.
Macro lenses, on the other hand, are optimized for good quality at short distances – usually up to a scale of 1:1. As an alternative to a macro lens, beginners can also extend the barrel of normal lenses with extension tubes or bellows, thus making a standard prime lens macro-capable. However, they do not have optical elements and only ensure that the distance between the rear lens and the sensor becomes larger. This shortens the close focusing distance. The result is that the object moves closer again, achieving a larger magnification ratio.
For 2:1, you might need reverse adapters, for example. These are also recommended if you are a beginner and want to get a feel for photographing small objects, as they are much cheaper than a real macro lens. With them, you can attach normal lenses reversed to the camera and "cobble together" a magnification ratio of 2:1 with this DIY solution, sometimes with very good quality. For Canon cameras, there are reverse adapters with aperture and AF transmission; for Nikon and other manufacturers, you should use a lens with an aperture ring. However, you should not forget to then equip the lens with a UV filter for lens protection.
The UV filters from Rollei are color-neutral, multi-coated, and much cheaper than a new lens. So, when it comes to macro photography lenses, the brand really doesn't matter. You can get suitable macro lenses for Nikon, for Canon, Sony, Fuji and all other available camera brands.
If in doubt, and with a few compromises, you can mount a Nikon macro lens on a Canon with an adapter – and vice versa. Special macro lenses are identified by the designation 1:1, which refers to the aforementioned reproduction ratio. This offers the option of reproducing the subject on the sensor at its original size, i.e., at a 1:1 scale. This is what makes these lenses special. The object is reproduced on the sensor as large as it actually is. With a full-frame sensor, this would correspond to 36 mm by 24 mm.
Most suitable macro lenses are prime lenses, with focal lengths between 60 mm and 200 mm and a very short minimum focusing distance. Of course, you can also use macro lenses to depict the subject even larger; the impressive compound eye of a fly often only reveals its full effect at a 2:1 scale.
Here, you work with a magnification ratio that depicts the subject on the sensor twice as large as it is in nature.

Which lens should you use for macro photography?
Here's a brief list of common focal lengths. You should also consider that the choice of lens largely depends on the exact subject and the desired mood.
Here's what you should remember: The longer the focal length, the easier it is to position the tripod without scaring away the subject or darkening it with the lens's shadow.
- Short focal length: 30mm to 50mm
- Standard focal length: 60mm to 105mm
- Telephoto macro lenses: 150mm to 200mm
- For fast-moving insects: 105mm or 180mm lens, for a minimum distance between lens and subject of 30cm to 50cm
If you want to photograph something as small as aphids, a 1:1 magnification ratio is not enough, so a magnifying lens should be used. Alternatively, a teleconverter can be placed between the lens and the camera. These converters extend the focal length and the maximum aperture by the respective factor.
With a 90mm macro lens, a 1.4x converter would produce 126mm, a 1.7x converter 153mm, and a 2x converter 180mm. The minimum focusing distance does not change, the focal length increases – and thus you get closer to the subject.
If you don't want to buy your own macro lenses yet, but first want to "get a taste" of macro photography, you should experiment with a relatively inexpensive reverse adapter. This is needed to mount the kit lens, often included with the camera body, "the wrong way round" and use it as a macro lens. Another option would be close-up lenses or achromatic lenses.
A close-up lens is (roughly speaking) a magnifying glass that is screwed onto the front of the lens to reduce the minimum focusing distance. Close-up lenses allow you to get closer to the subject. These aids can also be placed in front of standard lenses to turn them into macro lenses.
Other important photo accessories include a remote release, possibly a small reflector, a beanbag and/or a tripod – but we will go into these items separately later in this article.

These macro photography tips lead to better results
Tripod or beanbag:
As good as you may be at shooting handheld, you should still use a firm and stable base to compose the image with the utmost care and calmly align the camera. Ideally, you should use a macro tripod. Otherwise, only a short shutter speed is possible.
Longer shutter speeds are also no longer a problem. You can use a normal tripod for macro photography; for low-angle shots, models with a reversible center column or with tripod legs that can be swiveled 180° are recommended. For "models" that don't want to stay still, you can also use a monopod – a single-leg tripod – to at least use minimal support and be able to take sharp photos at the right moment.
Instead of placing your expensive and sensitive camera directly on the ground, you should use a small beanbag, which, thanks to its very flexible filling, compensates well for uneven ground and securely fixes your camera on the very low-lying object.

Cable release:
Another guarantee for high sharpness is a cable release, as it allows you to trigger the camera without touching it. This is particularly helpful for this magnification size in macro photography.
For DSLR cameras, mirror lock-up should also be activated so that the mirror slap, caused by the minimal vibration of the camera body, does not impair sharpness.
Focus:
Once the camera is securely positioned, you should manually focus on the subject using Live View. By using the screen magnifier, you can work with enormous precision. If you are "following" the insect, however, you should have thought about the depth of field beforehand and practiced spot focusing in and after movement.
Here you can create a bit more "focusing reserve" by increasing the depth of field – but you may have to accept some compromises in the bokeh. Just to be clear: taking a perfectly sharp macro photo from dynamic motion would be like winning the lottery.
Nevertheless, you shouldn't "waste" too much time focusing if you've managed to follow the rare butterfly to its next stop and finally want to photograph it before the sun disappears below the horizon. Otherwise, the "wild hunt" will start all over again.
Stabilizer:
This should be deactivated when shooting on a stable surface to avoid incorrect corrections. Otherwise, it can be a great challenge to shoot a sharp image.
Macro photography lighting:
You can use a small LED continuous light or even a flash for macro photography.
However, please remember that even when dealing with insects, the principle applies that nature should be disturbed as little as possible – even recognized zoologists cannot say with 100% certainty whether and how much a triggered flash bothers or disturbs an insect. Therefore, it is better to flash too little than too much.
Reflector:
A small folding reflector can work wonders. It is possible to keep harsh light away from the subject by shading it, or to reflect warm light back into the scene using the gold foil. Reflectors, as passive lighting elements, are definitely preferable to active light sources.

Macro photography guide: Finding subjects for macro photos
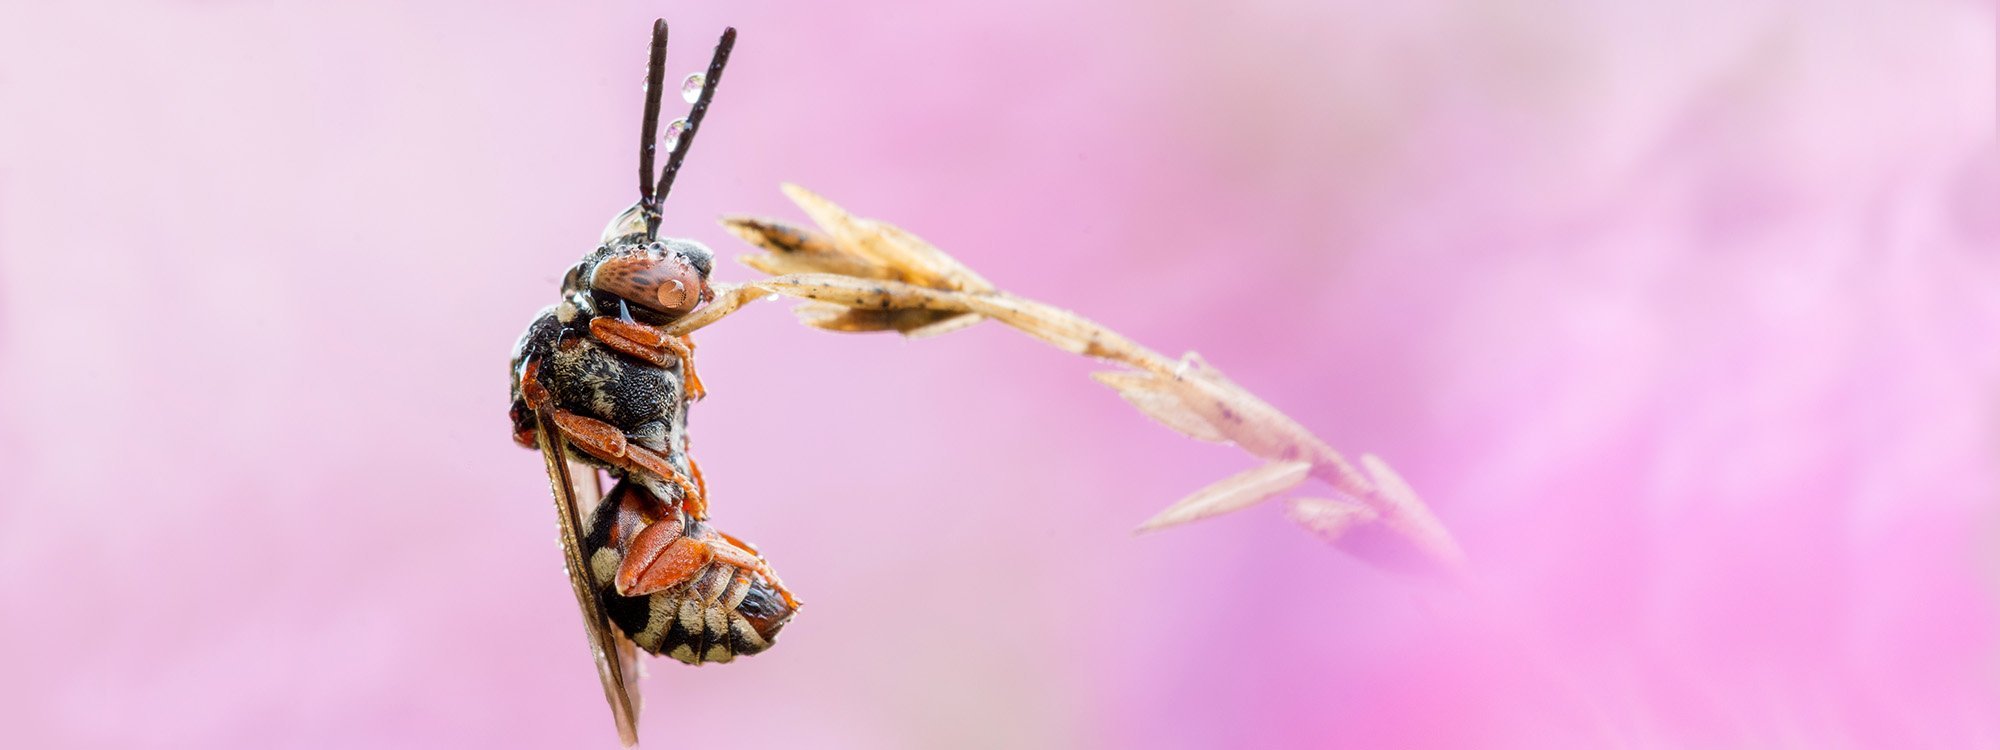
Small subjects can be found almost everywhere, which makes finding suitable macro photography subjects relatively easy. For example, bees, which are barely visible to the naked eye, make interesting subjects.
However, you present more exciting pictures to your audience precisely from the species that you don't find on every tree or flower. If you dedicate yourself to a particular species, knowledge of its habitat is, of course, advantageous.
Some knowledge of the biodiversity of the class of arthropods or insects (as insects are also called) is even indispensable for targeted and successful subject searching. For example, you can encounter blue butterflies in dry, nutrient-poor locations, whereas dragonflies are more likely to be found on and around ponds. It is also important to know the time of year when the potential subjects are most active to catch the right time for photographing. Once this knowledge is available, the search for the favorite subject begins, which can be very time-consuming, but rarely boring. Experience shows that during the search, opportunities for other exciting subjects often arise.
Flying animals like beetles are in themselves a very rewarding subject for macro shots, as they have comparatively short escape distances or camouflage strategies. Anyone who walks cautiously and with open eyes through a supposedly "typical" spring meadow will discover numerous objects that at first glance appear to be plants, but on closer inspection turn out to be very photogenic insects that use the first rays of sun to "wake up".

When do I find a suitable subject for macro photography?
For insects, the search time should be in the evening or morning, as these poikilothermic animals are most likely to stay still at these times.
If you want to increase your chances of getting a good picture, it makes sense to check in the evening where the animals' sleeping places are, so you can revisit them in the first light of morning and take the photos. For amphibians, reptiles, and flowers, it is also recommended to use the soft light of evening or morning.
Once the subject has been found, only the interplay of photographic technique, light, and subject needs to be right to get the most beautiful picture possible. However, preferences and image ideas are so different and subjective that there is no "right" or "wrong," but only a few recommendations.

Macro photography ideas
The most important photographic design tools for successful macro photos are image sharpness and the interplay of foreground and background. Only with pin-sharp subjects and a suitable background will you earn the recognition you desire.
These success factors influence each other - experienced macro photographers usually focus on the insect's head and choose the depth of field so that all body parts relevant to the respective image statement are also sharply depicted. You can achieve better macro photos if you also include the surroundings in the depth of field.
Then play with the aperture to place the pin-sharp head of a fly against the most atmospheric bokeh (background blur) possible and also to ensure the necessary contrast. If the foreground and background of your photos are too similar, the image "drowns" and is only suitable as a bad example.

What are some tips for macro photography beginners?
In addition to photo-technical photo accessories, there are a few other items that make an experienced outdoor photographer's life much easier:
Suitable outdoor clothing and/or sleeping mat
Unless you're chasing after many colorful butterflies in the best summer weather, even experienced macro photographers can get too cold or wet over time. If you sit for hours next to a perfectly grown plant waiting for the "planned" insect to finally settle on it, you should wear warm and waterproof clothing, not only in particularly wintry temperatures.
In the fresh air, our body cools down considerably without movement sooner or later, and moisture significantly accelerates this process. For safety, simply take a thin sleeping mat or at least a robust garbage bag with you, which also takes up hardly any space.
Tools and stabilization material
If the flower stem breaks off at the crucial moment, the long-awaited insect also immediately takes off. Stabilize plants with gardening wire or toothpicks; feel free to take a little modeling clay with you for the most invisible support and fixation.
Knife, scissors, screwdriver and mini-pliers - in the form of a multi-tool or combination pocket knife - outdoor photographers should always have with them anyway, and fabric tape completes the small toolbox for macro photos.
Water spray bottle
Dewdrops are particularly good as a reflective light source or size reference, especially for smaller insects. Unfortunately, dew rarely manages to be "on site" at the right moment in the right droplet size on its own.
No problem - simply help yourself and always take a small water spray bottle with you. A mini-blower will also do in a pinch.

Conclusion
Macro photography is not rocket science and does not require spending thousands of dollars. However, without special photographic equipment, you will sooner or later miss out on success.
Our tip: Start with a retro adapter, a sturdy outdoor tripod and a remote release - these will also serve you well if, contrary to expectations, macro photography does not develop into your personal favorite photographic discipline!
Share:
Underwater Photos in the Studio: The Workshop with Manfred Zentsch
Time-lapse Photography: An Introduction to Spectacular Photos