Rembrandt lighting is primarily suitable for portraits, or even specifically for beauty portraits. It is named after the famous Dutch painter Rembrandt van Rijn, who often used this type of lighting on faces for his particularly characteristic pictures.
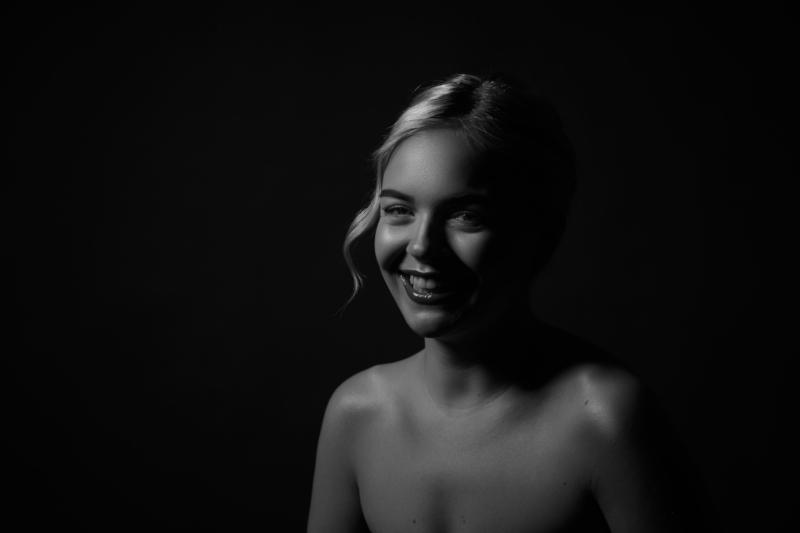
THE FINAL PHOTO

EQUIPMENT
The good thing about this lighting setup is that it can be implemented with fairly simple means. This is because it is easily achievable with a continuous light – of course, not only a continuous light, but also a flash head with a softbox is possible to achieve the desired effect. However, it is a bit more difficult to implement and certainly requires a few more attempts. If you work with Rollei flashes, for example, you can use the modeling light to preview the later lighting and shadows. In this case, you can see, for example, whether the triangle under the eye is visible or not. If it is visible with the modeling light and the flash is correctly positioned, then you only have to worry about the light intensity afterwards.

REMBRANDT LIGHT SETUP
To implement it, the main light must be placed above the model's head, but shifted far to the side. This creates a very distinctive triangle of light on the shadowed cheek of the face facing the camera, which can also be seen in Rembrandt's paintings.For Rembrandt light, the respective light shaper must be placed diagonally above, to the left or right of the model, and also elevated, so that the characteristic drawing with the light triangle can even be created. An indication that you have done everything correctly with the setup is that the shadow of the nose pulls diagonally (depending on the setup) to the right or left and then connects with the shadow of the cheek.
It is important – especially when setting up this lighting setup – that the model does not move their head after the precise alignment of the light. Because if movement occurs, it can already change the entire setup, which would result in tedious realignment of the light. After a little practice, however, Rembrandt lighting should soon no longer be a problem.

Creating mysterious beauty portraits
In this case, the light source came from the left, so that a striking strand of model Alina's hair was particularly beautifully illuminated and lit up to the hairline. Here, primarily the left side of the face is illuminated, which creates a somewhat mysterious atmosphere, making the picture as a whole more exciting to look at.
You can then decide whether to take the picture in color or black and white, depending on your taste. In this case, we chose black and white because it is classic and timeless and at the same time emphasizes the mysterious atmosphere that Rembrandt lighting brings.
More from Ebbe Fotografie:
Photo: Ebbe Fotografie
Model: Alina
Share:
Great photos can be taken with a smartphone too!
Introduced: The Rollei Professional Filter Holder Mark II (with Video)